Showing posts with label to be crafty. Show all posts

Wednesday, October 19, 2011

I Have the Best Husband on the Planet....

....because he does things like crochet beanies for Baby Hippo while he's out of town....

Photobucket

(For some inexplicable reason, Baby Hippo's eyelid was swollen this day, and he was also in a bad mood (my attempt at tickling couldn't even illicit a smile), perhaps the latter being related to the former.)

When John came home and fitted this over Baby Hippo's head, I said, "You didn't make that, did you?" When he answered "Of course!", I was stunned, my mouth literally gaping open. I have no idea how to crochet. So anyways, sorry if you're jealous. Love you, John!


Wednesday, February 3, 2010

How to Reupholster a Cushioned Chair

Have I told you recently how amazing my husband is? Among the many things he did for me on my birthday yesterday, including letting me sleep in, sweeping the kitchen floor, buying me a CD, a DVD, a fan duster (don't worry, it was upon request), a tres leches cake, and THIS floral arrangement...


...was to reupholster four bar stools! I love these bar stools, but after 4 years and 9 kids, the beige cloth coverings just got nasty and I couldn't handle it anymore..


Plus, as each day passed, they continued to get nastier and nastier as the 3-year-old boy has yet to learn that food should stay on the table, and not on chairs, his clothes, and the floor. Thus, I knew that recovering them in new fabric would be a feckless effort, as they would just become filthy again in a matter of days. My solution? To cover the chairs with a gorgeous fabric, then cover that with a thick, clear plastic. Here's how it went...

First John laid the cushion upside down on said fabric, then cut the fabric to size and pulled it tight to the back of the cushion...


He then stapled the fabric in place, first pulling the sides tight, then the corners...


Here are two of the four fabric-finished cushions...


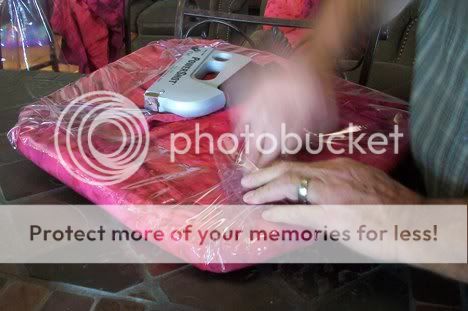
He then performed the same process with the clear plastic...


...and here is the finished product...


Admittedly, it would look better without the shiny plastic, but that idea is an impossibility at my house, and I am just so thrilled with how they turned out and how easy they are to wipe down after a meal!

I totally love how the pink looks against the green island...


...and I am the luckiest girl to have such a multi-talented, considerate husband! Thank you, again, John, for a spectacular birthday! You are the best husband ever!

Monday, December 14, 2009

Please Join Us Today for The "Make It From Scratch" Carnival!

Welcome to this week's...


...blog carnival! Being the host, I got to be the first to see all of the wonderful things people are making from scratch in the blogosphere during this holiday season. Rather than tell you about them, here - let me show you!

Jeff V. Brimley presents "Santa's Little Helper" posted at Brimley Studios.


June Tree presents Turkey Pops and a Happy Thanksgiving 2009! posted at The Digerati Life.
Enjoy!


Heather @ Marine Corps Nomads presents Handmade Christmas: Doll Bed posted at Marine Corps Nomads, saying, "Handmade American Girl doll bed set."


Lori Vaughn presents Make It Yourself Christmas #4 Glitter Ornaments posted at Telling Secrets.


Brooke Allen presents Glittery Holiday Cards posted at Rambling Brooke.


Rhiana presents Frugal Food: Homemade Croutons posted at A Frugal Life - Just the Two of Us.


Kimberly Clay presents Antique Christmas Gifts – Top 3 Antique Christmas Gift Ideas posted at Central Kentucky Antiques and Collectibles.


Stephanie presents Making Cloth Napkins from an Old Shirt posted at Stop the Ride!.


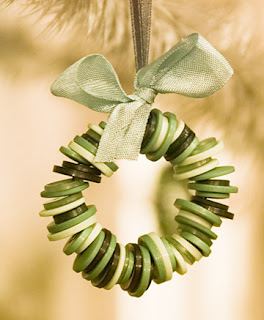
Jessica Christman presents Christmas Craft Project – Button Wreath Ornament posted at factorydirectcraft.com.


Kara presents Food as Gifts posted at An Hour In the Kitchen.

Revanche presents A Gai Shan Life: Giving "invalid fare" a new meaning posted at A Gai Shan Life.


Abi presents Cupcake tree ornaments posted at lighter side.


Sarah presents Our First Jesse Tree posted at Glory In The Clutter.


Kristia presents Chunky Potato & Leek Soup posted at Family Balance Sheet.


Amanda Louden presents Winter Squash Drop Biscuits and Weekly Dinners posted at Daily Diner.


pbmedia presents How to Unclog a Toilet posted at jammer(six).

Thursday Bram presents Picking the Best Fonts for Invitations posted at Desktop Publishing.


Deb Harbour presents These cookies make great gifts posted at My Kitchen Table.


SimplyForties presents Stuffed Focaccia with Onions, Zucchini, Mushroom and Fontina posted at SimplyForties.


RecycleCindy presents Crocheted Kitchen Gift Set posted at My Recycled Bags.com.


Lucky presents Recipes For When You've Run Out posted at Making My Own Luck.

Alexandra presents Make Your Own Magnetic Paper Dolls posted at Happy Hearts At Home.


NerdMom presents Easy Chocolate Pecan Pie posted at Nerd Family Food.


So there you have it! Hope you have a great time perusing all of the awesome "Make It From Scratch" posts. Don't forget to leave comments to let our writers know they are appreciated! Next week's carnival will be hosted at Frills in the Hills. Make sure you don't miss it! Have a great day!

As a side note, if you love working on projects and learning new skills, consider taking a couple of classes online. Did you know that you can earn a PHD or a nursing degree over the internet?

Monday, November 23, 2009

Homemaker Monday: How to Make High-Quality Fire Starters Out of Trash

Welcome to the 68th weekly edition of...


Thank you for joining us! If you're new to this carnival and would like to enter your post, please check HERE for the rules and regs.

YOURS: This week's "YOURS" again goes to Tara over at Feels Like Home. She was featured last week as well, but I had to pick her again for her post on "The Best Pecan Pie EVER"! Since Thanksgiving is in four days, I knew this would be the perfect link to include. Plus, her photo is so delectable and mouth-watering...


For Tara's recipe, click HERE. Thank you so much, Tara, for faithfully participating in Homemaker Monday every week and we'll look forward to more great tips and recipes from you in the future!

MINE: I kind of have an obsession with dryer lint. I can't seem to throw it away. It's just that it's so soft and fluffy and sometimes it's vibrantly colored. Once, about ten years ago, I saved up enough to fill a gallon Ziploc bag and this I used as a decorative pillow insert. This worked very well until the Ziploc bag broke and the pillow became very dusty. After that I never really found a good use for dryer lint, except to put in a 72-hour emergency kit to use as a fire starter. That is, until now.

Way back on November 9, 2008, a woman named Carol was featured on THIS Homemaker Monday and she linked a tutorial I never forgot. However, I never got up the gumption to try it until last week, and now I will share with you what I learned.

Carol taught that one can make high quality fire starters using dryer lint, cardboard egg cartons and candle wax. Here's why this is important to me...we heat our home with FOUR wood-burning stoves. Each box of fire starters we purchase is about $10, which means $.50 each time we start a fire. This can add up quickly, so I finally decided to give these a go. Here's how it went...

Here's what you'll need...


Step 1: Place egg carton on a towel...


Step 2: Place a small wad of dryer lint into each egg receptacle...


Step 3: Melt the wax in the old candle you didn't like the smell of. I did it by sitting them atop my wood-burning stove...


...and pour this over the dryer lint...


Step 4: Let dry until hardened, then separate each egg receptacle with scissors or a serrated knife. Here is your finished product...


(I know, not too pretty, but you just wait.)

Here is the true picture of how they work.

First we stacked large logs into our wood-burning stove...


We then placed the fire starter under a couple of the logs...


The fire starter caught within seconds, which was much more awesome than the fire starters we buy at Walmart...


It burned for about fifteen minutes...


...but soon thereafter, to my shock and chagrin, began to dwindle...


...until only the bottom of the large logs were glowing...


I was so crestfallen. However, I thought that perhaps the momentum could be picked up again by inserting another fire starter in the same location. This one caught just as awesomely as the first...


...and kept burning...


and burning...


...and burning until these beautiful logs were lit and we had a full-fledged fire! Woohoo!


Conclusion: For trash, these fire starters are awesome and I won't be purchasing the fancy fire starter boxes at Walmart ever again!

OURS: Okay, let's hear what all of your awesome homemakers have for us today. Feel free to link an old post if you don't have something especially prepared for today. Thank you so much for linking up and I hope you have a wonderful Homemaker Monday!